
Life's a garden. Dig it.
In this tutorial, we'll see how to create, deploy, invoke, and schedule a Python script using Google Cloud Functions. More importantly, I'll show you my workflow for iteratively developing and debugging this kind of system.
Create a Pub/Sub-triggered cloud function
Let's start with a really simple goal; to deploy and run a Python script that prints "Greetings Earthlings".
Step 1: Create a new Google Cloud Project
Create a new Google Cloud Project ->
What's a Google Cloud Project?
A Google Cloud Project is a top-level container for your work. In other words, it's just a high layer of abstraction for "a thing that does stuff". To give you a better idea..
- Users are created and managed within a project.
- APIs and tools are enabled with a project.
- I create and manage one project for each of my businesses.
- It's common to have a single billing account for a single project, but occassionally you'll see one billing account cover the expenses for multiple projects.
- If you're creating more than one project per day or fewer than two projects per year, you're probably doing it wrong.
There's no hard and fast rules to this stuff. Just get your hands dirty and improve over time.
Still lost? Follow the docs here ->
Step 2: Create a Pub/Sub-triggered cloud function in the console
Once you've set up a poject, creating your first cloud function in the Google Cloud Console is relatively straightforward. Try following the docs. Use Pub/Sub as the trigger. Then see my steps for this below.
What's the "Google Cloud Console"?
The Google Cloud Console refers to the web interface (i.e. tools in the browser).
In terms of creating a cloud function, we could do it from the command line or from a third-party client using code. ...Or we can create a function from the console meaning, from inside the browser, without writing any code.
My recommendation is always to do things from the console first as it's easier to learn and harder to make mistakes. Then level-up using the command line and third party clients.
Here's a quick video of a cloud function being created in the console.
-
Navigate to the Cloud Functions page, then click CREATE FUNCTION.
The first time you do this, you'll need to enable some Google Cloud APIs. If you run into trouble here, it probably means you don't have the correct IAM permissions to enable services. -
Give your function a name. Then set the trigger type to Cloud Pub/Sub.
HTTP vs Pub/Sub
I recommend starting out with Pub/Sub triggered functions until you need a feature supported by HTTP.
HTTP Pub/Sub Max Runtime 60 minutes 9 minutes Invoke-ability hard easy Returns a response? yes no After choosing Pub/Sub as the trigger type, you'll need to select or create a Pub/Sub "topic" that your cloud function subscribes to.
For those unfamiliar, Pub/Sub is Google's mechanism for sending messages between Google services. It literally stands for "Publish/Subscribe". In our case, the cloud function subscribes to all messages with the topic "MyTopic". That's its trigger to run.
We haven't worked out how to publish a message yet, but we'll see that in a bit.
-
Click NEXT. If if you're prompted to enable more APIs, click ENABLE.
-
Change the Runtime to Python 3.12 or whichever version you prefer.
Warning
When you change the default Runtime, Google gives you some nice boilerplate files and code but if you modify the code and then change the runtime, Google will not overwrite your edited code. So be sure to change the Runtime before you edit any code.
The default Python code includes two files:
main.pyandrequirements.txt.main.py import base64 import functions_framework # Triggered from a message on a Cloud Pub/Sub topic. @functions_framework.cloud_event def hello_pubsub(cloud_event): # Print out the data from Pub/Sub, to prove that it worked print(base64.b64decode(cloud_event.data["message"]["data"]))requirements.txt functions-framework==3.*Every (Python) cloud function must include these two files.
requirements.txttells Google which packages to install.main.pycontains the entry point function or class that Google runs when the Cloud Function is triggered.
By default, the entry point is
hello_pubsub. So, Google expects to find a function namedhello_pubsub()somewhere inmain.py.Furthermore, the
@functions_framework.cloud_eventfunction decorator is used to modify thehello_pubsub()funcion to properly accept and handle acloud_eventas input.The
cloud_eventparameter receives the details of the Pub/Sub message that invoked the function. -
(Optionally) Click TEST FUNCTION to test that your function works. (This is notoriously slow, and I've gotten in the habit of skipping this step.)
-
Click DEPLOY
Step 3: Manually invoke the cloud function
Because we created a Pub/Sub-triggered function, we can invoke our cloud function by publishing a message to the same topic that our function is subscribed. Assuming you're starting from the Cloud Function Details page, the easiest way to do this is...
- Click the TRIGGER tab
- Click the link under Receive events from
- Click the MESSAGES tab
- Click PUBLISH MESSAGE
- Leave the defaults in place and give your message a body like "Test 1"
- Click PUBLISH
Navigate back to your cloud function details page and view the LOGS tab. You should see a log that includes "Test 1".
Step 4: Modify the function source code
We want our function to print "Greetings Earthlings". Go to the function details page and modify the source code in main.py accordingly.
Tip
Confusingly, there are two edit buttons in the function details page. The one up top let's you edit all most aspects of a function. The one below (inside the SOURCE tab) lets you quickly edit the source code. For this step, use the edit button in the SOURCE tab.

Your code should look something like this 👇
import base64
import functions_framework

@functions_framework.cloud_event
def myfunc(cloud_event):
    print("Greetings Earthlings")
Make sure the name of your function matches the entry point name.
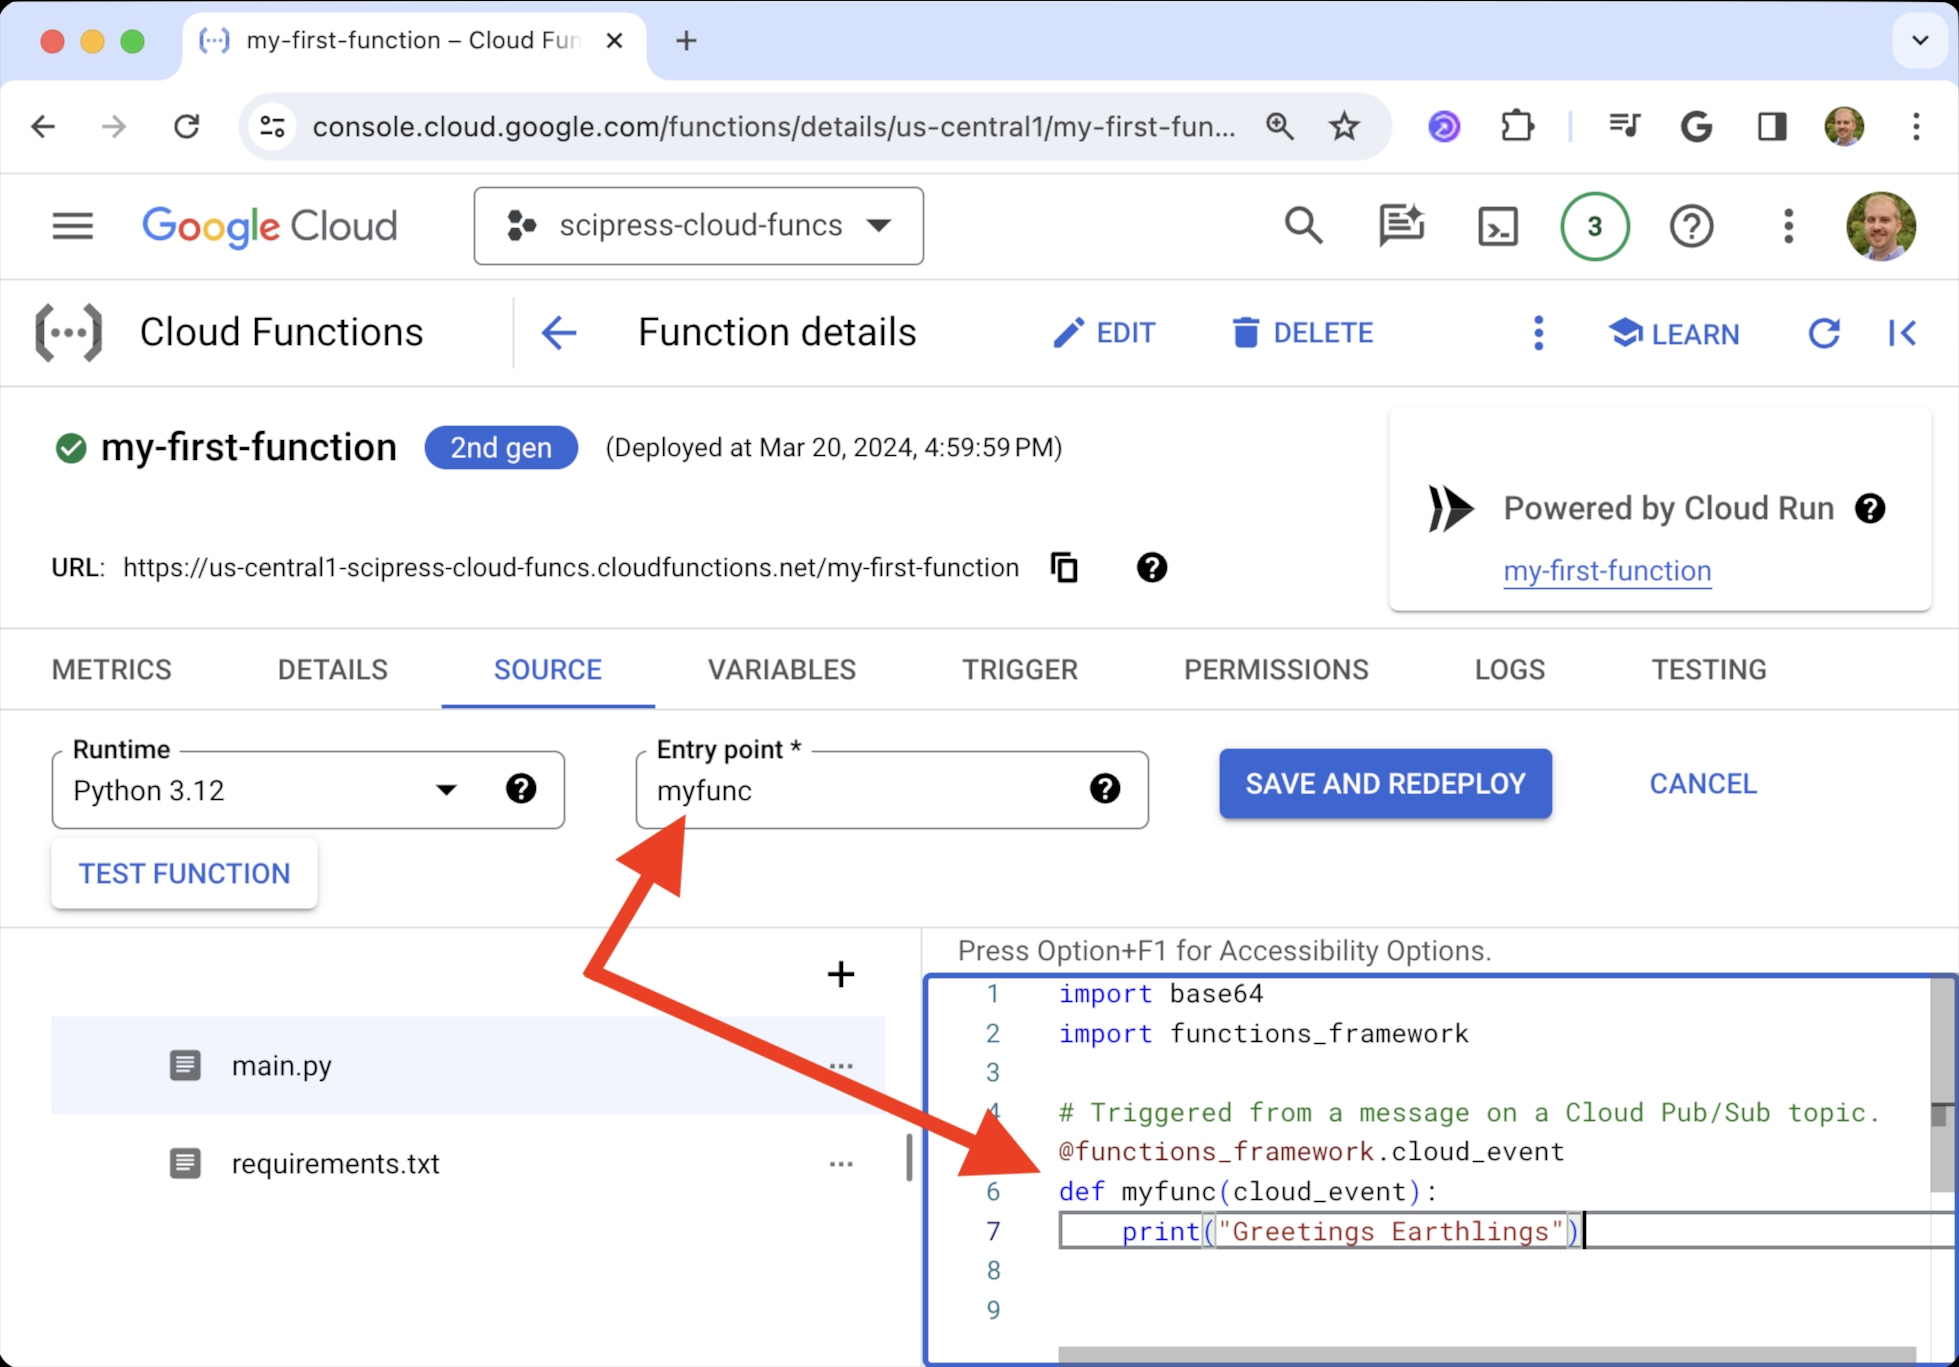
Click SAVE AND REDEPLOY. Then test your code by publishing a message just as you did in step 3.
Step 5: Schedule function to run every hour
You can use Cloud Scheduler to trigger your function to run on a predetermined schedule. (E.g. every hour, every day, the last day of every month, ...)
-
Click CREATE JOB or SCHEDULE A JOB
-
Give the job a name and choose a region. (Pick the same region as your cloud function)
-
Enter a Frequency in the form of a cron expression. For example
# Every minute
* * * * *

# Every hour, at minute 0 (0:00, 1:00, 2:00, 3:00, ...)
0 * * * *

# Every day at hour and minute 0 (today @ 0:00, tomorrow at 0:00, ...)
0 0 * * *
If you're relatively uncomfortable writing cron expressions (like most of us), check out Crontab.guru.
-
Pick a timezone
-
Set the target type as Pub/Sub (since we created a Pub/Sub-triggered function) and choose the same Topic that your function is subscribed to. Also provide a message body. (Our function doesn't use the message body, but it could be useful in some cases.)
-
Click CONTINUE and leave the default settings in place.
-
Click CREATE
At this point, your function should execute on your specified schedule. If you want to test it right away, select the job you just created and click FORCE RUN.
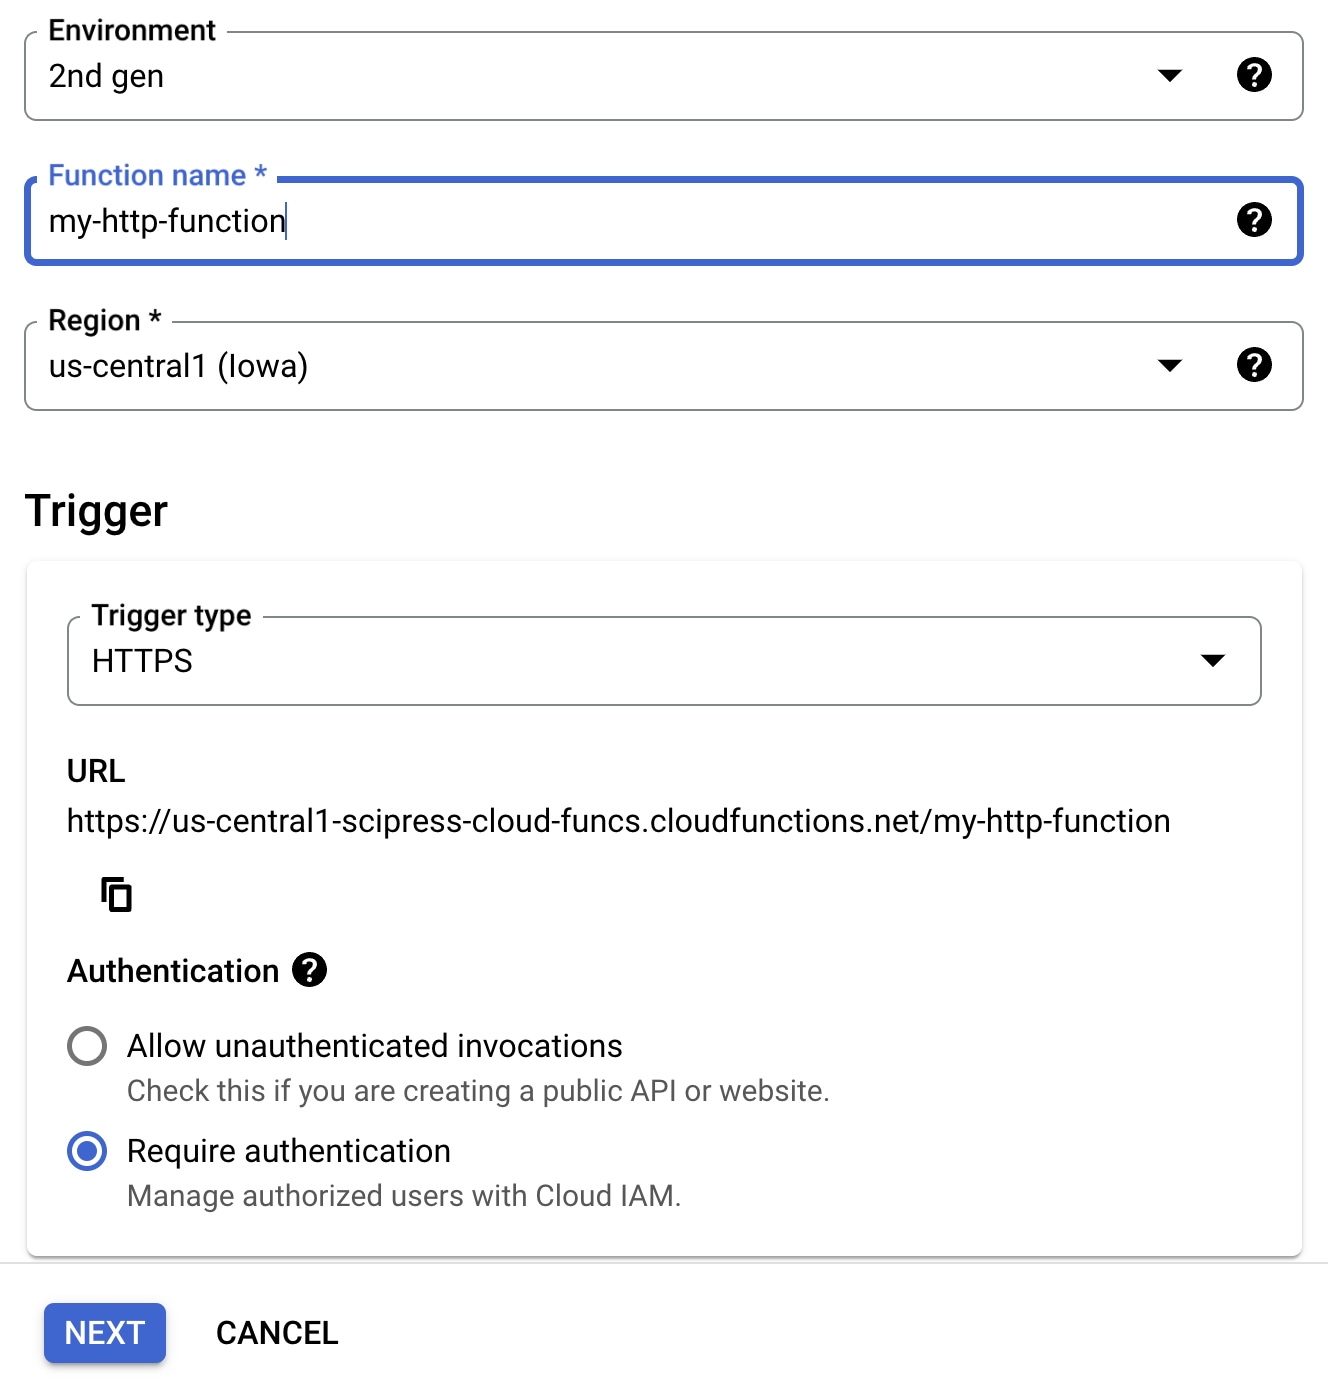
Create an HTTP-triggered cloud function
Creating an HTTP function from the console is 90% the same as creating a Pub/Sub triggered function. The obvious difference is to set the Trigger type as HTTPS.
The default Python code looks like this
import functions_framework

@functions_framework.http
def hello_http(request):
    """HTTP Cloud Function.
    Args:
        request (flask.Request): The request object.
        <https://flask.palletsprojects.com/en/1.1.x/api/#incoming-request-data>
    Returns:
        The response text, or any set of values that can be turned into a
        Response object using `make_response`
        <https://flask.palletsprojects.com/en/1.1.x/api/#flask.make_response>.
    """
    request_json = request.get_json(silent=True)
    request_args = request.args

    if request_json and 'name' in request_json:
        name = request_json['name']
    elif request_args and 'name' in request_args:
        name = request_args['name']
    else:
        name = 'World'
    return 'Hello {}!'.format(name)
As indicated by the code, a Python HTTP-triggered function recieives a Flask request object as input. This object includes things like the request method (GET / POST/ PUT), headers, cookies, query parameters, etc.
For our simple task, we can simplify the boilerplate code to this 👇
import functions_framework

@functions_framework.http
def greetings(request):
    print("Greetings Earthlings")
In this example we don't return anything, but we could. That's one of the advantages of HTTP functions over Pub/Sub functions.
Invoking an HTTP-triggered function
You can use cURL to invoke your function.
-
Open the TESTING tab in your function page. It should look like this.
-
Near the bottom is a "CLI test command". Copy and run it in your local terminal.
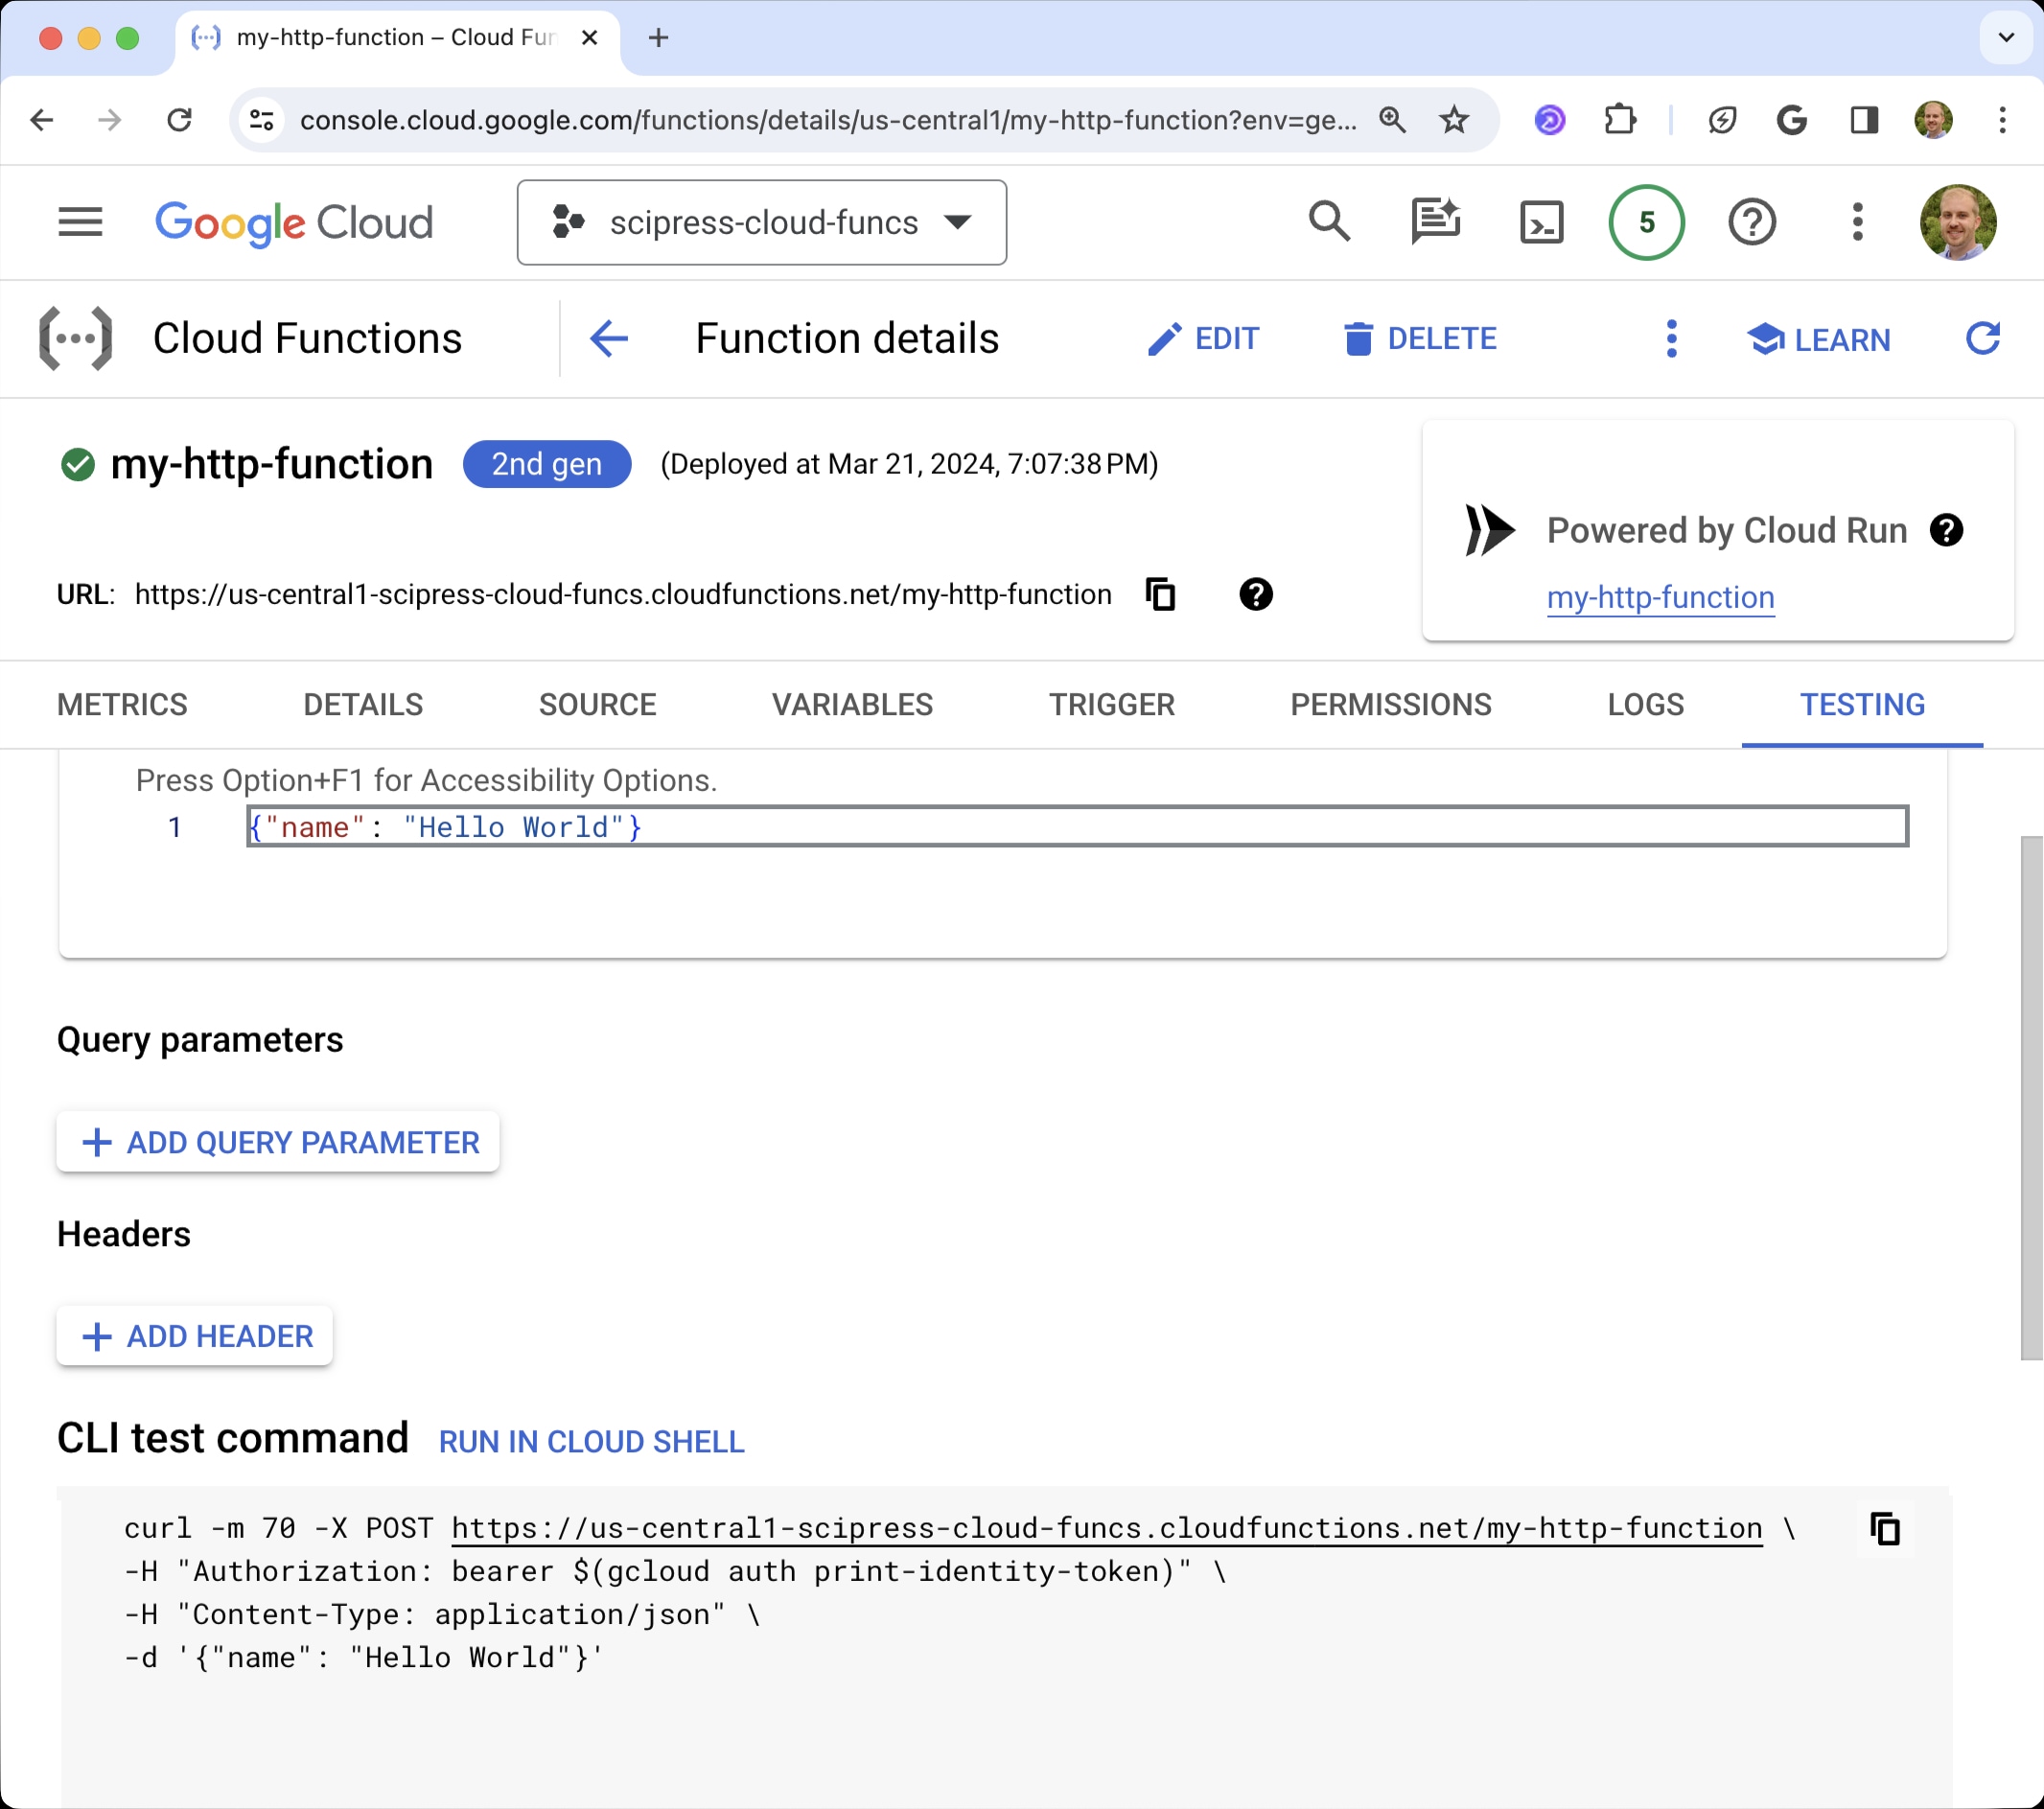
Notice this line in the CLI command 👇
curl -m 70 -X POST https://us-central1-scipress-cloud-funcs.cloudfunctions.net/my-http-function \
-H "Authorization: bearer $(gcloud auth print-identity-token)" \
-H "Content-Type: application/json" \
-d '{"name": "Hello World"}'
By default, HTTP cloud functions require authentication. You can turn this setting off, but you shouldn't unless you want to expose your function to the world. So, a "bearer" token needs to be sent with your request in order to authenticate with your function.
This bit 👉 $(gcloud auth print-identity-token) generates a bearer token using the gcloud CLI. This assumes you've already installed the CLI on your local machine 😉
Developing cloud functions from a local development environment
Listen up! You DO NOT want to be creating and managing your cloud functions from the console forever. The web interface is great for learning and testing toy examples, but any real-world project will have multiple source code files and require lots of tinkering and tweaking. You don't want to manage that process from the console.
A better workflow is to use an IDE like Visual Studio Code to write your cloud functions. Then you can deploy them from your local machine using the gcloud CLI (Command Line Interface).
How do I deploy a function from my local development environment?
See gcloud deploy. Google has a nice writeup about deploying cloud functions with the gcloud CLI here ->
-
Set up a project directory structure akin to this
my-project/
  funtions/
    main.py
    requirements.txt
If your
main.pyimports code from another local python script, you should include that script in thefunctions/directory.my-project/ funtions/ main.py utils.py requirements.txt -
In your local terminal, run
gcloud functions deploy (NAME)with your desired parameters. For example,gcloud functions deploy MyFunctionName --project=my-project-id --region=us-east1 \ --runtime=python312 \ --source=functions \ --entry-point=myfunc \ --trigger-http \ --no-allow-unauthenticatedIn this example,
source=functionstells Google to upload thefunctions/directory.If you save this command to a file like
deploy.sh, you can just run./deploy.shin your terminal to execute the command.
Notable parameters
- Use
--timeoutto change the default run time limit. E.g.--timeout=3600sets the max runtime to 3600 seconds (1 hour). - Use
--memoryto change the default memory limit. E.g.--memory=2Gisets the memory limit to 2 Gigabytes. - Use
--ignore-fileto prevent a specific file from being uploaded. E.g.--ignore-file=deploy.shpreventsfunctions/deploy.shfrom being uploaded. (Alternatively, use a.gcloudignorefile.)
How do I deploy multiple functions that use the same code?
Suppose you have Python functions foo() and bar(), and you want to create a cloud function for each. However, each function imports a helper function baz() from the same utils.py file. How do you set up a local project where you can deploy each function without duplicating code?
Set up a directory structure like this
my-project/
  funtions/
    main.py
    utils.py
    foo.py
    bar.py
requirements.txtfoo.pydefinesfoobar.pydefinesbarmain.pyimportsfooandbar
def foo():
print("foo")def bar():
print("bar")Then run a deploy command with the parameter --entry-point=foo to create the first cloud function and another deploy command with the parameter --entry-point=bar to create the second cloud function.
How do I schedule an HTTP function to run on a recurring basis?
You can use Google Cloud Scheduler to schedule an HTTP function just as you can with a Pub/Sub triggered function. However, HTTP functions require a bit of extra work.
- Create a service account with the Cloud Run Invoker role
- Set up a Cloud Scheduler job. While creating the job, choose
Auth header = OIDC tokenand select the service account you just created.